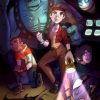
Above is a test shot that I have made for my film “Automatic Doors”. In the shot the main character is preparing to leave her apartment. I have the camera pan with her as she leaves the room and heads out into the hall. I wanted to do something different that would be more interesting than the usual static background, yet something more interesting than the common 3d background.
The over all conceit was that the background should not look 3D but should look like a moving illustration. I had previously tested this idea on an earlier version of my film. It did not come out nearly as good as this. Mind you this shot has no FX applied to it, this is the strait render from the 3D application. That brings me to a fundamental difference between the first go at making “Automatic Doors” and the new version. Other than the characters all being simplified, the new version will feature almost all CGI backgrounds. I am using this little program called Blender. I thought that after using May a GNU (aka totally free application), would suck in comparison. I was dead wrong. Blender has to be one of the best 3D applications I have played with. It has a bit of a learning curve. But after you get the basics down your flying! Also Blender has a really great public help community on the site.
So how was this shot done, basically I modeled all the objects using polys, then lit and baked all the maps to the objects. After that I imported the baked maps into Photoshop and painted over them. Then you reimport all the maps and viola! Mind you you also have to remember to turn off all lighting, since you are baking the lighting on the object, you do not need the API’s lights. This is also convenient in that it makes even 1080p renders fast.
I know I don’t post much, I will start sending out weeklies so that people out there might be able to see what I am doing with this. At some point too I have about 40 illustrations of Fetus that I made for work. Trust me they are cute!